
Automate your CICD Process with Jenkins

Introduction : In the first article we discussed CICD and how to use and configure Jenkins for CI.
In this article we will talk about advanced Jenkins configurations.
Advanced Jenkins Jobs
4.1 Parameterized Builds
It is always suggested that Jenkins jobs have one or more parameters to run. We’ll learn how to define the parameter and call it wherever we may within our code.
STEP 1: As a freestyle project, create a new job.
STEP 2: Select “General configuration” before clicking “Parameterize this project.”

STEP 3: We can use several types of parameters according to our needs, but for now, I’ll use the string parameter.
STEP 4: I’ve named the parameter “company” and set the default value to “TECHIFY,” which is optional. We can check the box to remove any whitespace from the beginning and conclusion of the sentence.

STEP 5: Leaving all other options alone, go to BUILD and select Execute as an option.

STEP 6: Click Save to return to the current job dashboard.
STEP 7: From the left side menu, select Build with parameters.
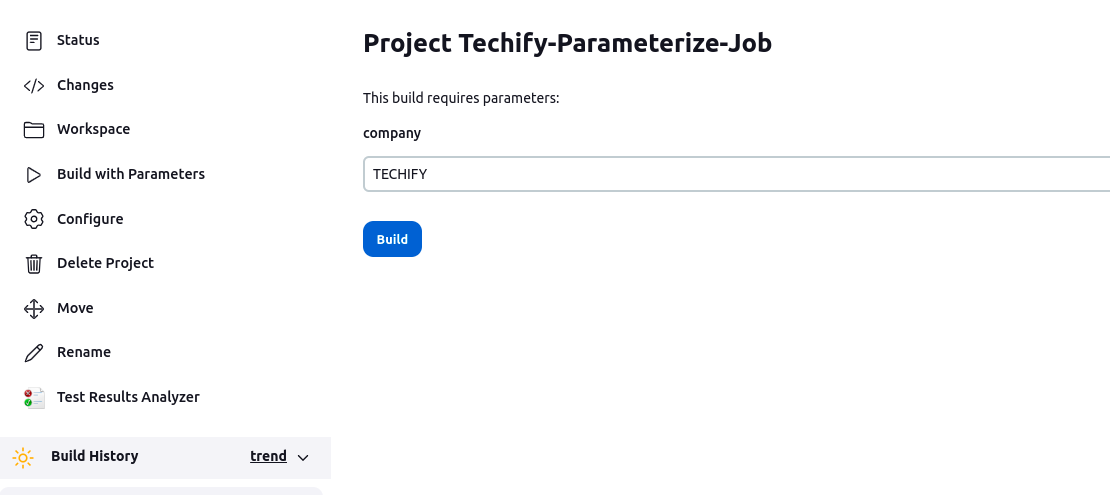
STEP 8: Enter any value for the parameter we defined, and for the time being, I’m using “TECHIFY DEPLOYMENT” as the service name, and then click Build.
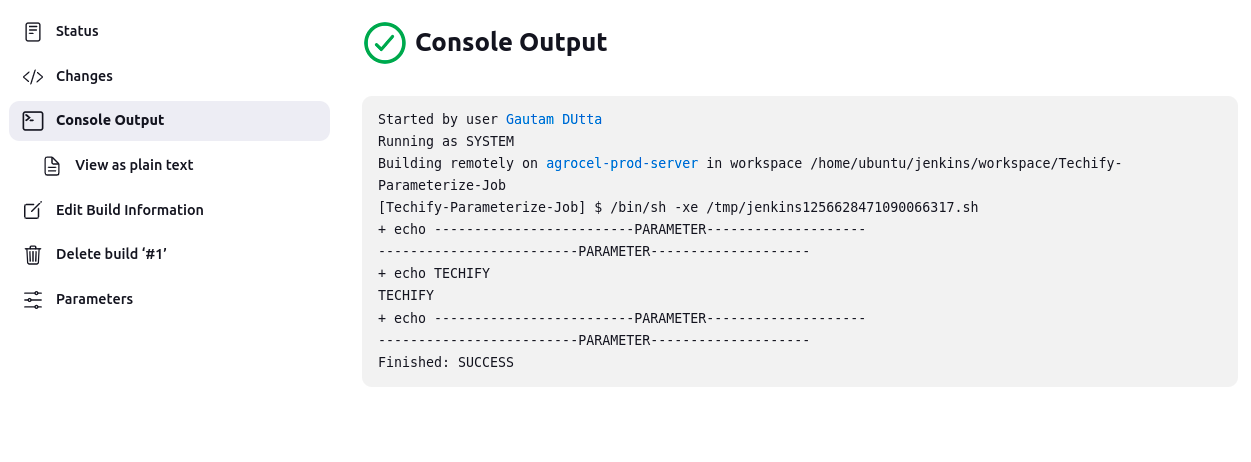
STEP 9: Open the build and navigate to the Console output to see that our service name value was called and output was produced.
4.2 Jenkins Pipelines
The Jenkins pipeline enables us to specify a comprehensive set of events that occur during the code lifecycle. Starting with the build and progressing to testing and deployment.
As a continuous delivery pipeline, we can use a set of plugins which help in the execution of specific procedures. Pipelines are defined using code by utilizing the Groovy programming language to define the processes that will run in the pipeline.
A Jenkins file must be present in the project’s root repository in order to implement pipeline as code.
4.2.1 Declarative Pipeline
Declarative pipelines are a recent addition to Jenkins. This option makes the pipeline’s code easier to develop and read later. However, there is a catch: the code is simplified since declarative syntax is more restricted. You will not be able to inject code into the pipelines at your own pace. If you intend to design a pipeline with advanced logic, such a pipeline model is not the ideal option.
Declarative pipelines break down phases into several steps, whereas scripted pipelines do not. Here’s an example:
| pipeline { agent { // executes on an executor with the label ‘some-label’ or ‘techify’ label “some-label || techify” } stages { stage(“build) { steps { // variable assignment (other than environment variables) can only be done in a script block // Only in a script block can complex global variables (with properties or methods) be run. // env variables can be set within a script block as well. script { foo = docker.image(‘ubuntu’) env.bar = “${build.imageName()}” echo “foo: ${build.imageName()}” } } } stage(“test”) { steps{ echo “test: ${env.bar}” echo “build: ${tec.imageName()}” } } } } |
4.2.2 Scripted Pipeline
You can utilize DSL (domain specific language) and Groovy syntax to create an automated pipeline. By putting it into a scripted Jenkins pipeline, you gain access to the extensive set of APIs included with the Java Development Kit (JDK). A Jenkins developer’s life is made easier by the use of DSL (domain specific language). It gives you complete control over the script and allows you to create a complicated pipeline in code.
The declarative Jenkins pipeline does not allow a developer to insert code, whereas scripted pipelines do. Here’s an example:
| node { git url: ‘https://github.com/techify/project.git’ // Retrieve the Artifactory server instance from the Artifactory Plugin management page. def server = Artifactory.server “SERVER_ID” // Read the upload specification and send files to Artifactory. def downloadSpec = ”'{ “files”: [ { “pattern”: “libs-snapshot-local/*.zip”, “target”: “dependencies/”, “props”: “p1=v1;p2=v2” } ] }”’ def buildInfo1 = server.download spec: downloadSpec // Examine the upload specification that was downloaded from github. def uploadSpec = ”'{ “files”: [ { “pattern”: “resources/Kermit.*”, “target”: “libs-snapshot-local”, “props”: “p1=v1;p2=v2” }, { “pattern”: “resources/Frogger.*”, “target”: “libs-snapshot-local” } ] }”’ // Upload to Artifactory. def buildInfo2 = server.upload spec: uploadSpec // Combine the build-info objects from upload and download. buildInfo1.append buildInfo2 // Publish the build to Artifactory server.publishBuildInfo buildInfo1 } |
4.3 Parallel and Distributed Builds
Parallelism is a trendy topic in continuous delivery pipelines: doing a lot of work, possibly as much as you can with the resources you have, at the same time. Many people are unaware that Jenkins is particularly adept at parallel workloads, whether across nodes in distributed builds or even within a live build.
Let’s start with a quick look at the “parallel” construct in Pipeline script. This is how it works:
| parallel ( “stream 1” : { node(‘techify-node-1’) { // runs on one of the nodes labelled as techify-node-1 build ‘Job1’ } }, “stream 2” : { node(techify-node-2′){ // only runs on nodetechify-node-2 build ‘Job2’ } } |
4.4 Using Jenkins Plugins for Enhanced Functionality
The plugins serve to expand Jenkins’ capabilities by introducing valuable features that may help you increase productivity and safeguard your build space.
Jenkins plugins can help your continuous integration go more smoothly by removing the need to write untested logic to complete jobs, fixing common problems with minimal effort, and promoting reusability between projects.
The following are some plugins that we shared that were really valuable for our projects.
- Kubernetes Plugin
- AWS CodeDeploy Plugin
- Blue Ocean Plugin
- Maven Integration Plugin
- JIRA Plugin
- Build Pipelines Plugin
- ThinBackup Plugin
Managing Jenkins Nodes
5.1 Understanding Jenkins Nodes and Executors
Node:
Jenkins uses the term “node” to refer to any system that can run Jenkins jobs. This phrase encompasses both controllers and agents and is sometimes used interchangeably. A node could also be a container, such as one for Docker.
The controller node is always present in any Jenkins installation, however it is not suggested to run jobs on it for the reasons stated above.
Executors
An Executor is simply a slot in which a job can be run on an agent/node. There can be zero or more executors for an agent. The number of executors per Agent determines how many jobs may be run concurrently to that agent. In the NextGen world of auto-scalable Jenkins agents, concurrency is defined as the number of agents with one executor active at any given time. When a controller directs jobs to a certain agent. In order for the work to be processed promptly, there must be an available executor or agent with at least one executor available. Otherwise, the jobs will be queued until the executor is available. The Jenkins controller can be used to specify the number of executors as well as other agent-specific properties such as workspace and environment variables.
5.2 Adding and Removing Nodes
Jenkins’ distributed nature is one of its best advantages. Multiple build slaves can be configured for greater segregation and scalability.
I’ll walk you through the procedures for configuring the Jenkins agent node using ssh keys, and then I’ll uninstall it.
Jenkins Agent/Node Prerequisites:
- Your agent server should have Java installed.
- A genuine Linux user account capable of performing the necessary actions on the agent server. (Ideally, a sudo user if your job necessitates elevated access)
- Because most build jobs require git-specific operations, Git should be installed.
Setting up Jenkins slaves using ssh keys:
Step 1: Log in as a linux user to the slave server. (If want sudo privilege at the time of job running then use root user)
Step 2: Make a directory called.ssh and cd into it.
| mkdir ~/.ssh && cd ~/.ssh |
Step 3: Run the following command to generate an ssh key pair. When prompted, enter for all defaults.
| ssh-keygen -t rsa -C “The access key for Techify Node” |
Step 4: Use the following command to add the public to the authorized_keys file.
| cat id_rsa.pub >> ~/.ssh/authorized_keys |
Step 5: Copy the private key’s contents to the clipboard.
| cat id_rsa |
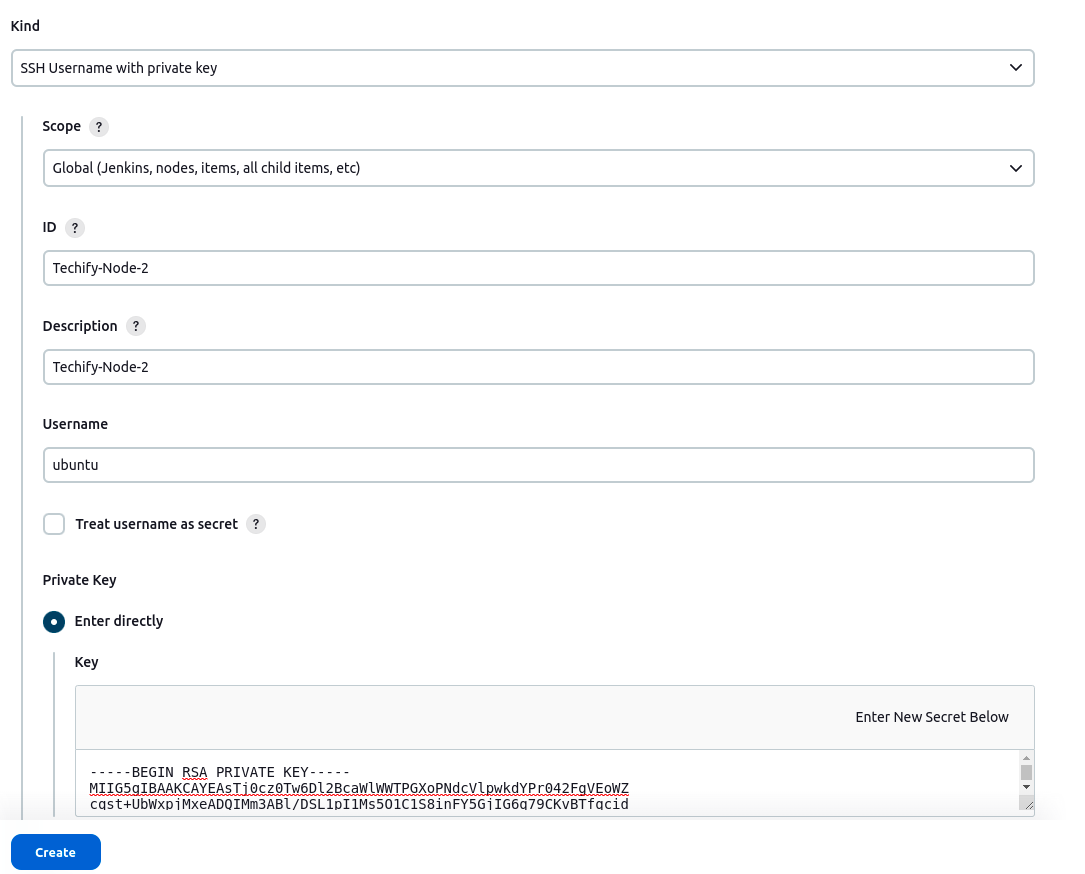
Put the SSH Private Key in the Jenkins Credentials.
Step 1: Navigate to Jenkins dashboard -> credentials -> Global credentials -> add credentials, then pick and enter all of the credentials shown below before clicking OK.
Connect the Jenkins Agent via SSH to the Master Node.
- Step 1: Navigate to the Jenkins dashboard and select Manage Jenkins -> Manage Nodes.
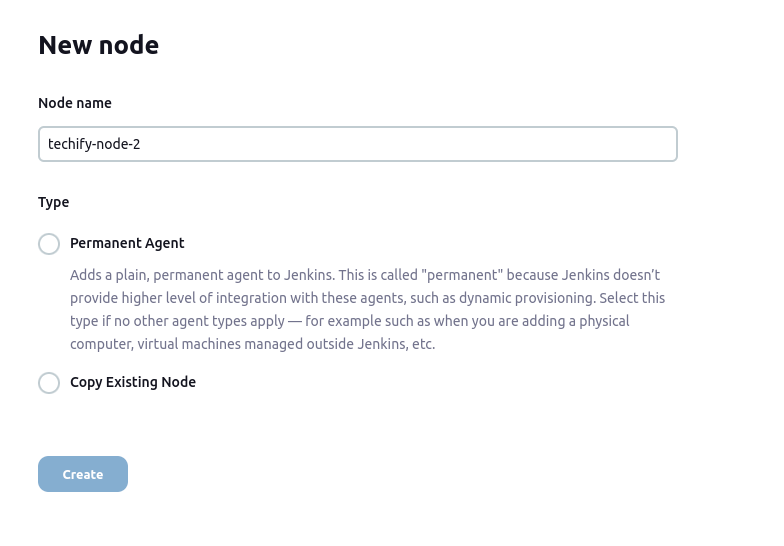
- Step 2: Choose the new node option.
- Step 3: Give it a name, then pick “permanent agent” and click OK.
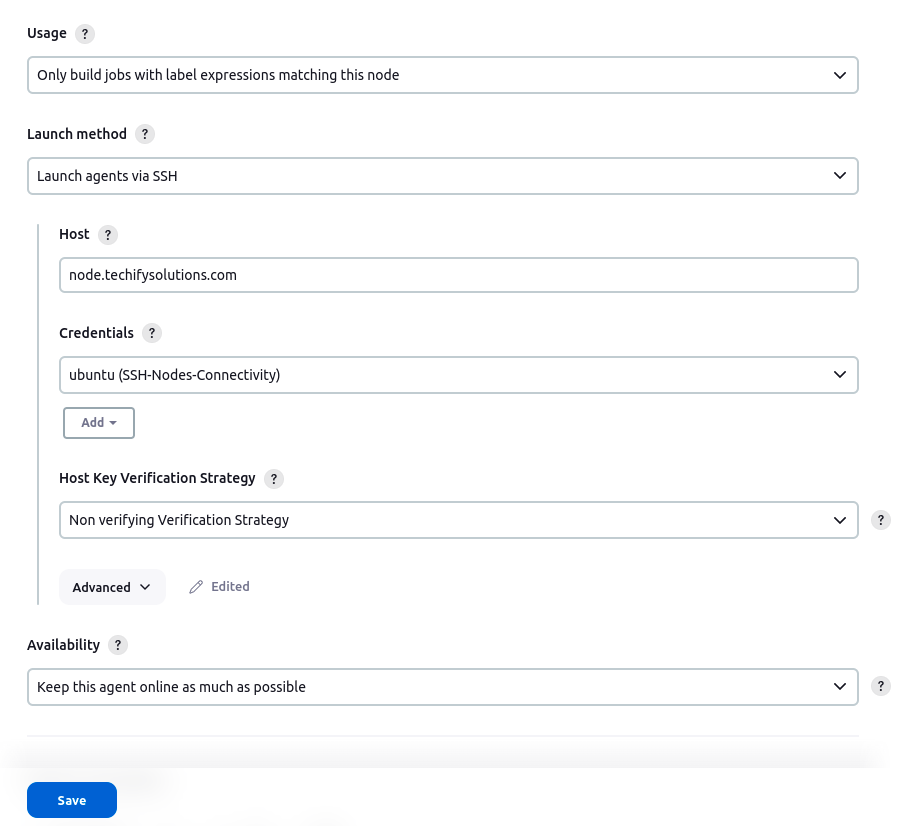
- Step 4: Fill in the information as shown in the image below and save it. Click the add button in the credential box and input the slaves Jenkins username and password (for logging into the slave machine) that you created during slave configuration. Click the question mark on the right side of each text box to learn more about each choice.

- Step 5: After you save, Jenkins will connect to the slave system and setup it as an agent.
You can add many servers as Jenkins agents by following the same steps.
Delete the node after configuring
- Step 1: Navigate to the Jenkins dashboard and select Manage Jenkins -> Manage Nodes.
- Step 2: Choose the existing node which you want to delete
- Step 3: Select delete agent option from right side and then press ok button in confirm dialogue box.

5.3 Configuring Node Usage
Setting up your Jenkins agent usage is critical for improving your Continuous Integration/Continuous Deployment (CI/CD) process. The execution environments where Jenkins conducts jobs are known as agents, also known as nodes. Here are the procedures to configure agent usage in Jenkins, as well as best practices:
- Node Labels:
Label nodes according on their characteristics (for example, “Linux,” “Windows,” “Docker,” “Java,” “Test,” and “Production”). Labels assist in categorizing nodes and specifying where jobs should run.
- Node Usage Strategy:
Select a node utilization strategy that is compatible with your workflow:
- Static Allocation: Use labels to assign certain jobs to run on particular nodes.
- Dynamic Allocation: Allow Jenkins to select the node to use based on the resources that are available and label restrictions.
- Node Restrictions:
Use the “Node Properties” functionality to specify requirements and limitations for nodes. You may, for instance, specify the tools or capabilities that nodes must have in order to execute certain jobs.
- Node Executors:
Set the number of executors that each node has available. A node’s capacity for concurrent builds is represented by its number of executors. Adapt this based on the capacity of your node.
Integrating Jenkins with Version Control Systems
6.1 Jenkins and Git Integration
Jenkins and Git integration is a simple process that involves specifying a few settings in both Jenkins and Git. The following are the steps for integrating Jenkins with Git:
STEP 1 – Install the Git Plugin: To begin, you must install the Git Plugin in Jenkins. Go to the Jenkins dashboard and select Manage Jenkins > Manage Plugins. Then search for “Git Plugin” and install it.
STEP 2 – Create a new job: Navigate to the Jenkins dashboard and select New Item. Name your job and choose “Freestyle project” as the work type.
STEP 3 – Configure the job: Go to the “Source Code Management” section of the job configuration page and pick “Git” as the type. Enter the repository URL, which should be something along the lines of “https://github.com/user/repo.git”. You must also supply your Git credentials, which might be a username and password or an access token.
STEP 4 – Configure the build trigger as follows: Navigate to the “Build Triggers” section of the task settings page and pick “Poll SCM”. When modifications are pushed to the Git repository, this will start a build.
STEP 5 – Save and execute the job: To save the job setup, click the “Save” button. You may now execute the job by selecting “Build Now” from the job dashboard.
6.2 Jenkins and SVN Integration
Integrating Jenkins with SVN is likewise a simple process that requires only a few settings in both Jenkins and SVN. The following are the steps for integrating Jenkins with SVN:
STEP 1 – Install the Subversion Plugin: The Subversion Plugin must first be installed in Jenkins. Go to the Jenkins dashboard and select Manage Jenkins > Manage Plugins. Then, in the search bar, type “Subversion Plugin” and install it.
STEP 2 – Create a new job: Navigate to the Jenkins dashboard and select New Item. Name your job and choose “Freestyle project” as the work type.
STEP 3 – Configure the job: Go to the “Source Code Management” section of the job configuration page and pick “Subversion” as the type. Input the repository URL, which should be something like “https://svn.example.com/project”. You must also include your SVN credentials, which can be a username and password or an access token.
STEP 4 – Configure the build trigger as follows: Navigate to the “Build Triggers” section of the task settings page and pick “Poll SCM”. When modifications are pushed to the SVN repository, this will start a build.
STEP 5 – Save and execute the job: To save the job setup, click the “Save” button. You may now execute the job by selecting “Build Now” from the job dashboard.
6.3 Best Practices for Version Control Integration
Integrating version control with Jenkins is critical for properly automating your CI/CD pipeline. Here are several best practices for integrating version control into Jenkins, notably with Git:
- Use a Version Control System:
To maintain your source code, always use a VCS such as Git. Git is extensively used and smoothly works with Jenkins.
- Separate Branches:
Create distinct development, testing, and production branches. Avoid making modifications directly to the main branch (e.g., master or main).
- Webhooks or Polling:
When possible, use webhooks. Webhooks enable your VCS (for example, GitHub or Bitbucket) to automatically alert Jenkins when code changes occur. If webhooks aren’t accessible, use polling with caution to avoid overloading your VCS server.
- Credentials Management:
Using the built-in credential management system or a plugin like the “Credentials” plugin, securely store Git credentials within Jenkins. Hardcoding credentials in scripts or setups should be avoided.
- Branch Strategies:
Implement a branching technique that works for your development workflow (e.g., Gitflow or GitHub Flow). This technique determines how code in your VCS goes through different branches.
- Pipeline as Code (Jenkinsfile):
Create a Jenkinsfile to define your CI/CD workflow. Storing your pipeline as code means that your build and deployment processes are version controlled and traceable.
- Branch-Specific Pipelines:
Configure Jenkins pipelines to do different actions depending on the branch being built. For example, deploy feature branches to a staging environment and the main branch to production.
Jenkins and DevOps
7.1 Role of Jenkins in DevOps
Jenkins is an important part of DevOps since it is a popular and powerful automation solution for continuous integration and continuous delivery (CI/CD) pipelines. It aids in the automation of software application creation, testing, and deployment, allowing for faster and more reliable software development and delivery procedures. The following are some of the main roles Jenkins plays in the DevOps lifecycle:
- Continuous Integration (CI):
Code integration from different developers into a shared repository is automated.
- Automatic builds are triggered by code changes, allowing for continuous testing and integration.
- Allows team members to identify and collaborate on issues early on.
- Continuous Delivery (CD):
- Jenkins helps in the automation of software application deployment to various environments such as development, testing, staging, and production.
- Jenkins’ CD pipelines ensure that applications are routinely and successfully deployed to many environments with minimal manual intervention.
- This lowers deployment failures, speeds up delivery, and gives you more control over releases.
- Automation:
- Jenkins enables the automation of numerous time-consuming and repetitive operations in the software development and delivery pipeline.
- It can be set up to perform a variety of tasks, such as writing code, running tests, creating reports, deploying apps, and sending notifications.
- This automation eliminates human errors, saves time, and enhances overall DevOps process efficiency.
- Extensibility:
- Jenkins offers a large plugin ecosystem that may be used to interface with a variety of tools, services, and technologies.
- Jenkins pipelines can be customized by DevOps teams by adding plugins for version control systems, build tools, testing frameworks, cloud services, and more.
- Jenkins’ flexibility makes it very flexible to various technological stacks and project requirements.
- Monitoring and Reporting:
- Jenkins delivers deep logs and reports for each phase of the CI/CD process, assisting teams in swiftly identifying and troubleshooting issues.
- Integration with monitoring and alerting technologies enables teams to monitor pipeline performance and respond in the event of faults or performance bottlenecks.
- Scalability and High Availability:
- Jenkins can be set up for scalability and high availability to meet the demands of large and complicated projects.
- Jenkins can divide workloads over numerous computers using distributed builds and master-slave configurations, which improves performance and robustness.
7.2 Integrating Jenkins into DevOps Workflows
Preparing and modifying Jenkins to automate and streamline various stages of the software development and delivery process is required for integration into DevOps workflows. The following are the essential stages and best practices for incorporating Jenkins into DevOps workflows:
- Create Jenkins Jobs:
- Define Jenkins jobs (sometimes referred to as pipelines or builds) for each stage of your DevOps workflow. Building, testing, deploying, and monitoring are all common tasks.
- Create declarative or scripting pipelines that specify workflow phases using the Jenkins Pipeline DSL (Domain-Specific Language).
- Version Control Integration:
- Configure Jenkins to work with your version control system (for example, Git). Set up webhooks or polling to automatically trigger Jenkins builds when code changes are pushed to the repository.
- Automated Builds:
- Configure Jenkins to build your code automatically whenever changes are detected. Compiling code, packaging artifacts, and creating deployable artifacts may all be part of the process.
- Automated Testing:
- To automate testing processes, incorporate testing frameworks (e.g., JUnit, Selenium) into your Jenkins workflows.
- Unit tests, integration tests, and any other sorts of tests relevant to your application should be performed.
- Deployment Automation:
- Create deployment jobs or stages in Jenkins pipelines to automate your application’s deployment to various environments (for example, development, staging, and production).
- For safer deployments, use blue-green deployments or canary releases.
- Monitoring and Reporting:
- Integrate monitoring and alerting technologies into Jenkins to track pipeline performance and application health (e.g., Prometheus, Grafana).
- Jenkins should be configured to generate and archive build and deployment reports for auditing and analysis.
- Security and Access Control:
- To protect Jenkins, use role-based access control (RBAC) and authentication techniques.
- Using Jenkins credentials plugins, ensure that sensitive information (e.g., API keys, credentials) is securely stored.
- Backup and Disaster Recovery:
- Backup your Jenkins setups and task definitions on a regular basis.
- Prepare a disaster recovery plan to quickly restore Jenkins in the event of a failure or data loss.
7.3 CI/CD Best Practices in DevOps
Continuous Integration (CI) and Continuous Delivery (CD) are important DevOps methods that attempt to automate and streamline software development and deployment processes. Here are some best practices for DevOps CI/CD:
- Automation of Everything:
Reduce manual errors and boost efficiency by automating code integration, testing, and deployment procedures.
- Version Control:
To handle code changes and maintain traceability, use a strong version control system like Git.
- Small, Atomic Commits:
To facilitate tracking and integration, encourage developers to make modest, frequent contributions to the version control system.
- Automated Testing:
To discover issues early in the development cycle, implement a thorough suite of automated tests, including unit tests, integration tests, and end-to-end tests.
- Continuous Integration:
Integrate code changes into a shared repository several times each day, allowing teams to quickly find and resolve integration issues.
- Deployment Pipelines:
Create individual, automated deployment pipelines that represent stages for application development, testing, and deployment.
- Monitoring and Alerts:
Implement monitoring and alerting systems to detect and respond to concerns in real time.
- Deployment Automation:
To assure uniformity and eliminate the possibility of manual errors, automate the deployment process.
- Continuous Feedback:
Collect user and developer feedback to continuously enhance the development and deployment process.


