Introduction to Streamlit

Introduction to Streamlit
Streamlit stands as an open-source initiative designed to simplify data exploration and visualization. With its user-friendly interface, you can effortlessly transform your data scripts into dynamic web apps using just a few lines of Python code. From incorporating widgets, charts, and maps to displaying tables and more, Streamlit offers an intuitive API that caters to your creative vision. Plus, forget about grappling with HTML, CSS, or JavaScript complexities or configuring servers Streamlit handles all the technical aspects, freeing you to focus on your content.
Features and Capabilities:
- Simple and Intuitive API: Streamlit’s API is designed to be easy to use, with a focus on simplicity and readability. Developers can leverage familiar Python syntax to create interactive elements such as sliders, buttons, and plots, making it accessible to users of all skill levels.
- Live Code Editing: With Streamlit’s live code editing feature, developers can see instant updates to their application as they make changes to the code. This real-time feedback loop accelerates the development process, enabling rapid experimentation and iteration.
- Built-in Widgets and Components: Streamlit provides a rich set of built-in widgets and components for creating interactive user interfaces. From data visualizations and input forms to custom HTML elements, developers can easily customize their applications to suit their specific requirements.
- Seamless Deployment: Deploying Streamlit applications is effortless, thanks to its built-in support for popular hosting platforms such as Heroku, AWS, and Google Cloud Platform. With just a few commands, developers can share their applications with colleagues, clients, or the wider community.
- Community and Ecosystem: Streamlit boasts a vibrant and active community of users, contributors, and enthusiasts. The ecosystem is continuously growing, with a wealth of third-party libraries, extensions, and templates available to enhance and extend Streamlit’s functionality.
Use Cases:
- Data Exploration and Visualization: Streamlit is ideal for building interactive dashboards and visualizations for exploring and analyzing datasets. Whether you’re visualizing trends, patterns, or correlations, Streamlit makes it easy to create compelling data stories.
- Machine Learning Prototyping: Streamlit streamlines the process of prototyping and deploying machine learning models. Developers can quickly build and test predictive models, evaluate performance metrics, and showcase results in a user-friendly interface.
- Data-driven Applications: From recommendation systems and sentiment analysis tools to financial calculators and reporting dashboards, Streamlit enables the creation of a wide range of data-driven applications tailored to specific use cases and industries.
In this blog post, we’ll embark on a journey to build a sleek and functional blog app using Streamlit and Python. Leveraging a SQLite database, you’ll gain the ability to create, browse, search, and manage blog posts seamlessly. Additionally, you’ll have access to insightful statistics and visualizations, providing valuable insights into post trends and author contributions. By the end, you’ll have crafted a polished blog application that epitomizes simplicity and elegance.

Prerequisites:
Python 3.6 or higher installed on your system.
- Streamlit and its dependencies installed. You can install it using pip with the command,
pip install streamlit
or refer to their website for installation instructions.
- A preferred code editor such as Visual Studio Code or PyCharm.
- A basic understanding of Python and Streamlit. If you’re new to Streamlit, you can refer to their documentation or tutorials for guidance.
Step 1: Create a database
To initiate our blogging platform, the initial action involves establishing a database to store blog posts and associated details. We’ve opted for SQLite, a nimble and autonomous database engine that eliminates the need for complex installation or configuration processes. SQLite’s unique characteristic lies in its single-file storage system, facilitating effortless management and backup procedures.
For database creation, we’ll harness the capabilities of the sqlite3 module, an inherent Python library offering seamless interaction with SQLite. Additionally, we’ll leverage the functionality of the pandas module, renowned for its adeptness in data analysis and manipulation tasks. These modules will be imported at the outset of our Python script to ensure their availability throughout the development process.
Next, we’ll establish a connection object to represent the database. This is achieved using the connect function, which requires a file name as its argument. If the specified file doesn’t exist, it will be created automatically. For our database file, we’ll name it blog.db:
Next, we’ll instantiate a cursor object, enabling us to execute SQL commands on the database. This involves utilizing the cursor method of the connection object:
In conclusion, we’ll establish a table to manage our blog posts and their associated details. Employing the execute method of the cursor object, we’ll feed it with a SQL statement. This table, named “posts,” will encompass four columns: “author,” “title,” “content,” and “date.” We’ll designate the TEXT and DATE data types for these columns, ensuring they cannot contain NULL values. Moreover, we’ll employ the IF NOT EXISTS clause to guarantee that the table is created only if it doesn’t already exist.
The database creation process is now complete. To finalize, we can close both the connection and the cursor objects by invoking the close method:
Step 2: Define some functions for interacting with the database
Now, let’s proceed with defining several essential functions to facilitate interactions with the database. These functions will encompass functionalities for adding new posts, retrieving all posts, fetching a post by its title, and deleting a post. To ensure robustness, we’ll encapsulate each function within try-except blocks to gracefully handle any potential errors that may arise during execution. Additionally, we’ll utilize the commit method of the connection object to persist the changes made to the database.
The first function, add_post, will be designed to accept four arguments: author, title, content, and date. Its primary purpose is to insert a new row into the posts table, incorporating the provided values. This operation will be achieved through the utilization of the INSERT INTO SQL statement.
Let’s explore the implementation further:
The next function, named “get_all_posts,” requires no arguments. Its purpose is to retrieve all entries from the “posts” table. This is accomplished by executing a SELECT * statement, which fetches all columns from every row in the table.
The third function, named get_post_by_title, accepts a single argument: title. It retrieves a specific row from the posts table that corresponds to the provided title, utilizing the WHERE clause. In the event that no match is identified, the function returns None.
The delete_post function is the fourth function in the sequence. It requires a single argument, the title, which is used as a criterion for deleting a specific row from the posts table. This deletion operation is carried out through the execution of the DELETE statement.
The database interaction functions have been defined. To verify their functionality, let’s add some sample posts and print the results:
The output should look something like this:
Step 3: Define some HTML templates for displaying the posts
Next, we’ll establish HTML templates to present posts in a visually appealing manner. Leveraging Streamlit’s markdown capability, we’ll craft two templates: one for showcasing post titles along with brief previews, and another for displaying full posts alongside author and date details. Using Python string’s format method, we’ll seamlessly embed values into these templates. Additionally, we’ll apply CSS styling to enhance the visual appeal. Below are the templates:
The template titled “title_temp” accepts three parameters: the title, the author’s name, and the initial 50 characters of the content, followed by an ellipsis. On the other hand, the “post_temp” template requires four arguments: the title, author’s name, date, and the full content.
Both templates utilize a div element featuring a dark background color, rounded borders, and some margin for aesthetic appeal. The title is prominently displayed in white, centrally aligned text. Below the title, the author’s name and the date appear as smaller headings. The content is presented as a paragraph with justified alignment for readability. Additionally, an avatar image is positioned as a circular element on the left side of the div, enhancing visual appeal and personalization.
Step 4: Create a sidebar menu with different options
Now, let’s proceed by setting up a sidebar menu for seamless navigation within the application. We’ll leverage Streamlit’s selectbox method to craft a dropdown menu containing a curated list of options. These options include Home, View Posts, Add Post, Search, and Manage. Upon selection, the chosen option will be stored in a variable named “choice.” Below is the corresponding code snippet:
Step 5: Display the selected option
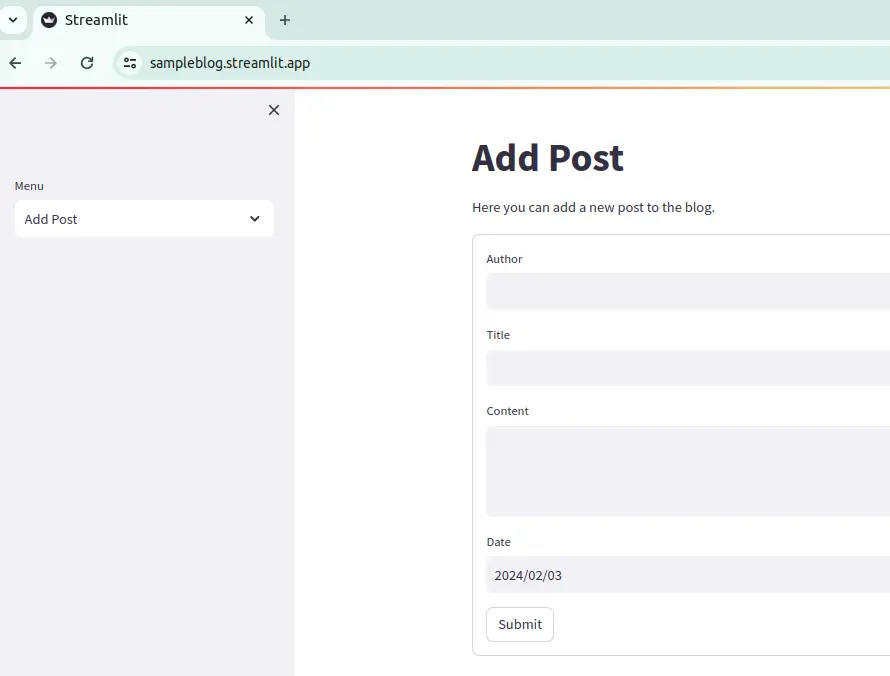
The last phase involves presenting the chosen option within the primary section of the application. We’ll implement an if-elif-else statement to inspect the value of the ‘choice’ variable and execute the appropriate code block. Leveraging Streamlit’s methods like ‘title’, ‘write’, ‘button’, ‘form’, ‘text_input’, ‘text_area’, ‘date_input’, ‘form_submit_button’, ‘markdown’, ‘selectbox’, and ‘checkbox’, we’ll design the user interface and functionality of the app. Below is the code snippet:
Congratulations! You’ve successfully created a blog app using Streamlit and Python. To run the app, simply type ‘streamlit run blog_app.py’ in your terminal and start enjoying your personalized blog experience. Feel free to customize the app further by adding additional features, styles, or components to suit your preferences. For more information and examples, visit Streamlit’s official website or documentation.
Conclusion
Streamlit represents a paradigm shift in the world of data science application development, democratizing access to powerful tools and insights. By combining simplicity, flexibility, and interactivity, Streamlit empowers developers to unleash their creativity and drive innovation in the rapidly evolving field of data science.
Whether you’re a seasoned data scientist or a newcomer to the world of programming, Streamlit offers a compelling solution for building data-driven applications that make an impact. Join the Streamlit community today and embark on your journey to revolutionize data science application development.
References
- Streamlit Documentation : https://docs.streamlit.io/
- Streamlit GitHub Repository : https://github.com/streamlit
- Streamlit Community Forum : https://streamlit.io/community
- Streamlit Gallery : https://streamlit.io/gallery
- Streamlit Blog : https://blog.streamlit.io/
- Streamlit YouTube Channel : https://www.youtube.com/playlist?list=PLgkF0qak9G4-TC9_tKW1V4GRcJ9cdmnlx


